Wednesday, November 30, 2011

Our Latest Project

Over the Thanksgiving weekend, John and Girl 1 worked on a project to get us ready for next spring:  a goat milking stanchion.  See below . . .
This little stand, hand-crafted by John, is designed for a milking goat to stand on while being milked.  Her head goes through the boards at the front where (on the side you can't see in this photo) a feeder is attached so that she can munch while being held securely in place for her milking. 

John has already begun work on the goat shelter and pen (photos soon).  We are hoping to get 1 or 2 milking does and probably a kid, too (because they're just so dad-gum cute!) in the early spring.  We're excited about all the things we can do with the milk, which will range from drinking it (obviously) and feeding it to other animals, to making products such as cheese, yogurt, butter, and soap.  Since I am mostly bed-bound right now, I've made myself a part of the project by reading.  I've read The Backyard Homestead, which has a great section on raising goats (and on a bazillion other amazing topics) and Milk Soapmaking, which is apparently the best book out there on the subject.  Yep, lots of exciting things are happening around here!

Friday, November 25, 2011

Storage Problem Solved

The problem:  With 5 busy people in this house and all their school, dance, soccer, AWANA, bike, and cold weather gear, we were having trouble finding WHAT we needed WHEN we needed it.  And don't even get me started on shoes!
So, this pic is what we started with.  This armoire is actually a TV cabinet that we had been using as random storage.  (We sold it for $50 to a FaceBook friend.  That basically covered the entire cost of the project.)  The baskets below are holding the kids' shoes.  The doorway on the left leads to the garage, so this is a highly trafficked area and  one that was not working as hard for us as it could.  It was time for a redesign.
Below is where we were attempting to hang the myriad things we need to be able to grab on our way out the door.  To say that it is overcrowded is a gross understatement.


Solution:  Now, here is the solution I came up with for that wall.  The only thing that stayed was the mirror.  Everything else is new (well, not really "new," just repurposed).

And, here it is once we moved all our gear in.

Here's what I did.  I started with three stacking bookshelves that we already had and lined them up side by side to create a bench.  The collapsible fabric storage cubes hold the kids' shoes.  They each get two cubes and a small space for boots between their cubes.  Lots of stores have these cubes, but I got mine at Home Depot.  I like them because they have lots of color options and have the little pockets that allow you to label the contents of each box. 

To create the seat cushion on the bench, I repurposed an old closet door that we had in the garage, topped it with upholstery batting, and stapled on the fabric (which I already had).  Also in this picture is the 8 ft. piece of pine I bought to stain and use for the long row of knobs.  We bought knobs from IKEA (cheap) and mounted them to the board to create 15 hangers.

For the boot drying rack, I topped a rimmed baking sheet with a cooling rack.  It fit perfectly! Also, it took up the space at the end of the bench that was leftover once I had my cushion on.

For the top level of storage, we cut and painted some IKEA shelving that used to be in the playroom and added more Home Depot storage boxes. 

All told, this was a super-cheap project that allowed us to repurpose a lot of things we already had on hand and left us with a much more usable space.  And the "grab your shoes, backpack, and umbrella" part of our morning went a lot more smoothly today than it has tended to in the past.  :)

Sunday, November 13, 2011

We've Got Chickens!

We've been thinking for awhile about adding chickens to our home.  We've read countless articles and a few books on the topic and finally decided that the best way to figure this out was just to dive in.  We were able to find a local guy who builds these great chicken tractors.  John did do some work on it to improve its design a bit. He added the white-framed door in the chicken wire, which allows us access to the girls while they are out of the house.  Also, he added the white door at the entrance to the house.  It's on a pulley so that we can open and close it from the outside.  Not pictured, on the back of the house are two nesting boxes that we can access from outside.  So far, it seems to be working great.  We like the idea of the tractor because it is on wheels and can be moved to fresh ground every day or so, so that the hens always have fresh ground to peck and fertilize. 
We bought our 8 hens from a local lady who got them as chicks in the spring.  They've been free-range on her farm since then.  They should be approaching laying age, so we are eagerly awaiting our first eggs!

We have 8 hens in all, 2 each of 4 different breeds.  The red one above is a Rhode Island Red.

The grayish hen on the left is an Araucana (she will lay green eggs).  The black one is an Australorp.  Her feathers have a blue sheen to them in the sun that is really very pretty.

This is a Plymouth / Barred Rock.  It is definitely my favorite.  I think they look like the quintessential chicken.
We have really enjoyed getting to know the girls.  With all their pecking and scratching and roosting and eating and dust bathing, they are definitely entertaining to watch.  They are actually a lot quieter than I expected them to be.  The only time they've really gotten to clucking was when Aslan (our outdoor cat) was examining the coop.  The kids are really enjoying the new additions.  They're eager to put on their rubber boots in the morning and let the girls out of the house.  We are definitely enjoying this new endeavor!

Friday, October 28, 2011

I Make Home.

I make home.


I feel so blessed to have the opportunity to stay home this year. And, because my surgery scheduled for October 10th didn’t happen, I am currently enjoying the gift of time I didn’t think I’d have on my feet.

One of the things I’ve done a lot of is reading. Little Boy and I attend the children’s time at the library every week, and I’ve begun a bit of a love affair with the library. I’ve been reading a lot of things about old homemaking crafts, gardening, and homesteading. I really enjoyed the book Radical Homemakers, and I’m trying to make my own, more natural versions of lots of household things (i.e. body soap, laundry detergent, dishwasher detergent, bread, juice).

We are making plans to do gardening differently this coming year and are working toward having some laying chickens in the backyard come spring. I am really enjoying getting my hands dirty. I love to make things, especially when making them means that I am avoiding being a consumer, doing something green, or providing a better product for my family. I am loving the idea of making our home as self-sufficient as possible, using a lot of the old homestead traditions.

While I am enjoying these various projects, relishing a slower pace, and loving my time with my little man, I do admit I’ve had a bit of an identity crisis. “What do you do?’ It’s a question I don’t get asked a lot around here, but John and I recently attended our college reunion, and it was the first time I stumbled over my answer. For the past 10 years, my I’m-a-teacher answer has been at the ready. Now, what do I do? It’s certainly not nothing. “I stay home.” Well, not most days. “I’m a homemaker.” It sounds like such a label, that brings with it so many other stereotypes. Today, when John popped in to say hello at lunch, he smelled the baking bread and said, “It smells like home in here.” I like it. That means I’m doing my job today. So, what is my job? “I make home.” I like that answer. It’s active. And I am active. I actively nurture Little Boy; I actively create things to support our family; I actively make a home that’s warm and nice to return to for the three of our brood who are away during the day.

Monday, October 10, 2011

Driftwood Centerpiece


Yesterday, I discovered Pinterest.com.  I can already tell that it will be a love/hate relationship.  Today, it was love.  I found inspiration and went with it.  Someone had pinned a table centerpiece that was a railroad tie with holes drilled to hold tealight candles.  It brought to mind the old piece of driftwood that I found along the White River a few years back on one of John and I's anniversary trips to the cabin.  For whatever reason (I think it's its unique shape), when I saw this piece of wood along the bank of the river, I loved it.  I cleaned it up, brought it home with us, and have had it sitting on the back porch ever since.  Today, it was promoted from backportch ornament to kitchen table centerpiece.  Here's what I did . . .
This 1.5" drill bit is the perfect size to fit tealight candles.

I decided which way I wanted to orient the wood on the table and drilled holes in the wood, being sure to keep the drill perpendicular to the floor.

See how perfectly the candle fits!

I put in a total of 7 holes.

Then, I brought it in to the table!  It may not be traditional decor, and it may not stay on the table forever, but I think it's beautiful!  Plus, it was super easy and didn't cost me a penny. I suspect that not all of the Pinterest-inspired crafts in my future will be the same.  That's where the hate part of the love/hate relationship will come in.  :)

Saturday, September 17, 2011

Our Compost Bin

So, this is the compost bin I built using 3 (free) wooden pallets.  It's not beautiful, but it sits behind the shed, so we can't see it from the house. It's close enough to the house and the garden plot to be convenient.  I cleared and broke up the ground inside the bin to prepare the spot. Then set up and screwed together the three pallets.  I did not close the bin in so that it will be easier to access and turn over.  However, if you have animals in your backyard, or do not have a completely fenced in yard, you could attach a 4th pallet (perhaps with a hinge?) so that it could be swung open for turning over the pile.

Now, I'm ready to load it up with goodies.  From left to right:  First, I have shredded newspaper straight from our shredder.  This helps to balance the pH levels of the compost.  Next, is my kitchen countertop scrap collecting cannister.  I have it by my cutting board and use it to catch anything that needs to go out to the pile.  (Be sure that this is an airtight container; otherwise, you will have a haven for those little fruit fly/gnat things on your kitchen counter.) Things that CAN be included are any uncooked fruit or vegetable scrap.  Things that cannot be inculded are basically everything else.  This is not just a dinner scrap pile!  Meats or oils will attract animals and will cause the pile to stink.  Lastly, I've included some lawn trash.  Lawn trash can be grass clippings or raked leaves.  It really shouldn't be weeds unless the pile is already established and hot.  Lastly, the pile needs to be damp in order to activate properly.  Just mix all that up and use a shovel to turn it in with some of the dirt below the pile. In a matter of days, it will get hot and the produce scraps will begin to decompose.  Within weeks, I'll have great compost to add to next year's garden!


Now that my pile is established, all I have to do is use my pitchfork every few days to turn everything over and be sure that it stays a bit damp.  Nature does the rest.

We've been recycling for awhile (even though I have to haul it to the plant myself), but I was amazed at how adding composting to our routine has cut down on our trash.  This pic is of one week's worth of stuff I am hauling to the recycling plant.  (I realize that it may not seem very "green" to carry recycling in plastic bags, but after finding the dumpsters at the plant full a time or two and not having a way to dump my loose recycling, I decided that this is the way to go.)

Brace yourself.  This is not a manufactured photo.  I am quite proud of this photo of a kitchen-sized bag of trash.  This is all the trash that our family of 5 will be sending to the landfill this week.  Hurray for us!  Between recycling and composting, we've been able to cut it to this!  You don't have to be an extreme environmental activist to recognize that the less we pile into our landfills the better, and recycling and composting are something that nearly everyone with a little bit of space can do!

Saturday, January 1, 2011

Gifts for Kiddos

Here are a few of the crafts that I've been doing lately and would be happy to sell to anyone who'd like to purchase!  To order, email me (Ashley) at bellerbrood@yahoo.com.
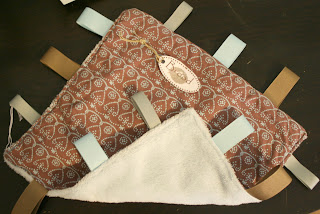
This is what I call a TAGGIE BLANKET.  It measures about 10"x10" with ribbon loops.  Babies love these!  One side has a print, while the other side features a super-soft and cuddly solid-colored fabric.  $8 each.
I mostly have more feminine ones made up right now.  However, I would be more than happy to make custom Taggies; just let me know what colors you'd like.

From left to right: pink, tan, brown, orange

These CRAYON APRONS are always a hit at birthday parties.  The apron measures about a foot in length and ties around the little artist to keep those crayons well within reach at all times!  $10 each.

Here are a few of the varieties I have available right now.

What about the little boys?  I wouldn't leave them out.  These are CRAYON ROLLS.  They are similar to the apron, only they just roll up and are tied shut with an attached ribbon.  These are great for throwing into mom's purse or into that busy bag for church!  $10 each.
Designs currently available are Spiderman, John Deere, camouflage, and soccer.